Author Archives: Roberto

Java Memory Management in Practice: Video Notes

This post contains the notes that accompany the video tutorial JMM in Practice on YouTube. On this video you can learn the basic principles of how the JVM performs garbage collection and manages the heap space.

Download the Source Code

You can download the source code from this GitHub repository.
It is a Maven project that you can directly import into your favourite IDE.

Installing and Running Visual VM

The Visual VM download page is located here.

To install Visual VM you just need to unzip the downloaded archive into a directory of your choice.

To run Visual VM invoke the binary for your operating system, passing the options for the JDK and user directory (this is the location where you want Visual VM to store data files).

For example, on Windows:

visualvm.exe --jdkhome <path to JDK> --userdir <path to user directory>


Once Visual VM is running you can activate the Visual GC plugin as follows:

1. From the menu select Tools -> Plugins
2. In the popup window select the tab “Available Plugins”
3. Check “Visual GC” from the list and click on the Install button
4. Close the popup

You should see the “Visual GC” tab now available on Visual VM.

Watch the Video

You now have all the tools you need to follow the video and replicate the experiment on your system.

Best GitHub eBooks For Beginners

I’m happy to announce that my book, “A Practical Guide to Git and GitHub for Windows Users: From Beginner to Expert in Easy Step-By-Step Exercises”, made it to BookAuthority’s Best GitHub eBooks For Beginners.

BookAuthority collects and ranks the best books in the world, and it is a great honor to get this kind of recognition. Thank you for all your support!

The book is available for purchase on Amazon.

The best GitHub ebooks for beginners

Recursion Demystified

This is the second post of the series “Algorithms Demystified” (the first post “Big O Notation Demystified” can be found here).

Before we start discussing recursion it is useful to have a basic understanding of how computer memory is used by a runtime system; as an illustration we will consider the behaviour of the Java Virtual Machine (JVM) but other modern runtime systems behave similarly.

Stacks and Heaps

To optimize memory usage the JVM divides it between Heap and Stack. The Heap space is used to allocate memory dynamically to objects when they are created.

The Stack is a temporary memory block used to store local variables when a method is called. Once the method completes execution this memory is cleared, and the block is reused in a last-in, first-out (LIFO) fashion.

Recursion

Recursion

It is the Stack that is of interest to us in this discussion of recursion. Recursion happens when a method makes one or more calls to itself. Programming languages that support recursion make it possible by using the LIFO Stack mechanism described above to support ordinary method calls. When a method makes a recursive call to itself its execution is suspended until the recursive call completes. Each recursive call will preserve its own copy of the method local variables.

Base Case

A recursive call must have an exit condition; this condition is called “base case”. If a base case is not defined or not reached the recursive call will propagate indefinitely eventually filling up all the memory space allocated to the Stack resulting in what is called a Stack Overflow which typically causes a program to crash.

An Example

There are several computing problems that can be solved by using recursion, one of which is the mathematical factorial function denoted as n!. The factorial function is defined as the product of positive integers from 1 to n (by convention the factorial of zero is one).
Let’s take as an example the factorial of 4:

4! = 4 * 3 * 2 * 1 = 24

We can implement the factorial function as a Java method as follows:

public static int factorial(int x) {
   // input validation
   if (x < 0) throw new IllegalArgumentException("Argument must be positive integer");
   // base case
   else if (x == 0) { return 1; }
   // recursive call
   else return x * factorial(x - 1);
}

To understand how recursion works suppose we call the factorial method above passing as argument the integer number 4. When execution reaches the recursive call the method suspends and calls itself with the argument subtracted by 1:

Call factorial(4) suspended (4 – 1 = 3)
Call factorial(3) suspended (3 – 1 = 2)
Call factorial(2) suspended (2 -1 = 1)
Call factorial(1) suspended (1 – 1 = 0)
Call factorial(0) base case: return 1

In the last call factorial(0) we reach the base case and all suspended recursive calls return:

factorial(0) returns 1
factorial(1) returns 1 * 1 = 1
factorial(2) returns 2 * 1 = 2
factorial(3) Return 3 * 2 = 6
Factorial(4) returns 4 * 6 = 24

The last return value 24 is the value of 4! as expected.

Conclusion

Computing problems that can be solved using recursion can also be solved iteratively. The advantage of using iteration over recursion is that the latter has higher space and time complexity. On the other hand recursion provides a more intuitive and cleaner solution to certain class of problems such as exploring tree structures.

Icons made by Smashicons from www.flaticon.com

Git and GitHub ebook 2nd Edition

I am happy to announce that the 2nd edition of my Kindle ebook “A Practical Guide to Git and GitHub for Windows Users” is available today at Amazon.

In this edition I have added an entire new chapter describing in detail how to implement the Centralized Workflow, giving readers the opportunity to review the techniques learned and apply them to a real-world project.

Chapter 3 has been updated to reflect some changes to the GitHub user interface.

The “Next Steps” section has now gained a separate space of its own at the end of the book.

Last but not least many thanks for the support and feedback received from readers of the 1st edition all over the world.

Debugging JDBC Connections with SQuirreL

Most Java applications use JDBC drivers to connect to a persistent store or database. Different databases however use different JDBC drivers and connection URL formats, and it can be very useful in case of problems to have a way to test that you are using the correct type and version of JDBC driver for your database and the correct connection parameters (connection URL, login credentials, etc) without having to write any code. Squirrel SQL is a universal Java database client that can be used for this purpose.

Squirrel SQL is open source, entirely written in Java, and can be used to connect to any database (SQL or NoSQL) for which there exists a JDBC driver. In this article we will explore how quick and simple it is to test a JDBC connection with Squirrel SQL.

Installation

The first step is to download the Squirrel SQL installer which can be found here:

http://squirrel-sql.sourceforge.net/

Note: if the URL has changed just type “Squirrel SQL client” on your favourite search engine to find it.

The installer is an executable JAR file, therefore you need to have a Java Runtime Environment installed on your machine. To run the installer, double-click on the JAR file or type on the command line:

$ java -jar squirrel-sql-<version>-install.jar

Follow the setup wizard to select the installation directory, keeping the defaults on the plugin selection screen. I also recommend selecting the option to create a desktop shortcut.

Squirrel SQL shortcut icon

Setup

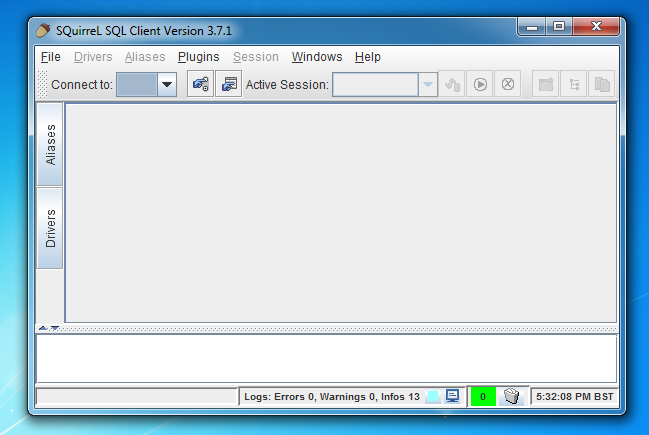
The installation directory will contain the squirrel-sql startup script (.bat in Windows or .sh in Linux). Run the script for your platform or double click the desktop icon to run Squirrel SQL.

Squirrel SQL main screen

Squirrel SQL main screen

We will now use Squirrel SQL to connect to an Oracle database. The same steps can be followed to connect to any type of database, SQL or NoSQL, for which there is a JDBC driver.

Of course you need to know some essential details about the database you are running such as version, the host name or IP address and the port number. If you don’t know how to collect such information consult your database documentation.

The database I am going to connect to in this example is an Oracle Database 11g Express Edition Release 11.2.0.2.0 running on localhost. The Oracle instance identifier (SID) is “xe” listening to port 1521.

Knowing the version of the database you are running will help you identify the JDBC driver you need. Normally database vendors provide a JDBC driver download website. Oracle’s is located at the following address:

http://www.oracle.com/technetwork/database/features/jdbc/index-091264.html

The site lists the drivers for the various Oracle versions. In this case I need to download the driver for version 11g release 2. I will select the JDBC thin driver (type 4) because it is platform independent as it is entirely written in Java and use Java sockets to connect directly to the database. If you are connecting to one specific database the Type 4 thin driver is normally the recommended choice.

Download the JDBC driver for your database and save it locally. The driver I have downloaded is a Java Archive (JAR) file named ojdbc6.jar.

JDBC driver file

Installing the driver

Connecting to a database with Squirrel SQL is quite simple. First you install the JDBC driver for your database, then you create an “alias” where you configure the parameters to connect to a specific instance. Once connected you can browse the database objects or issue SQL commands.

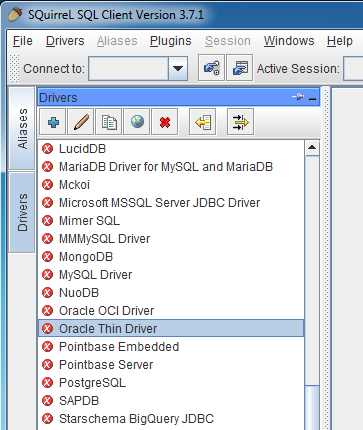
To install the JDBC driver, click on the Drivers tab on the left hand side of Squirrel’s main screen. You will see a list of drivers appearing in alphabetical order, where you need to locate the driver for your database. In this example, we will select (with a double click) “Oracle Thin Driver”.

Squirrel SQL Driver Setup

Squirrel SQL Driver Setup

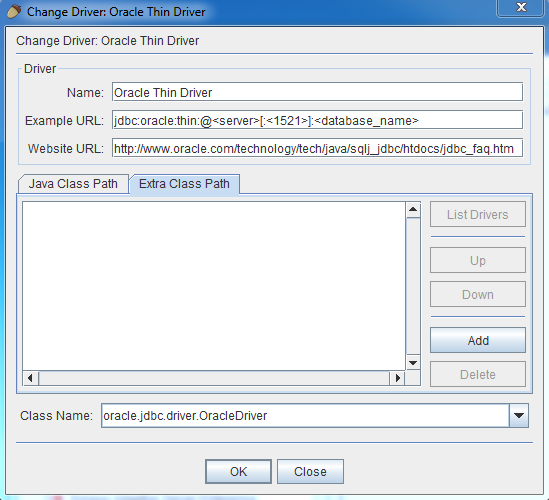
The following dialog displays showing the driver’s name, example URL and class name:

Driver Setup Dialog

Driver Setup Dialog

Now select the “Extra Class Path” tab, and click on the [Add] button. Browse to the location where you saved the JDBC driver you downloaded in the previous step, and click [Open]. The driver will be listed. Click OK to complete the installation. You will be returned to the driver’s list, and if all is OK a check mark will appear next to the installed driver.

Making the connection

Now that the JDBC driver is installed, the last step is to create an alias to connect to the database instance you are running.

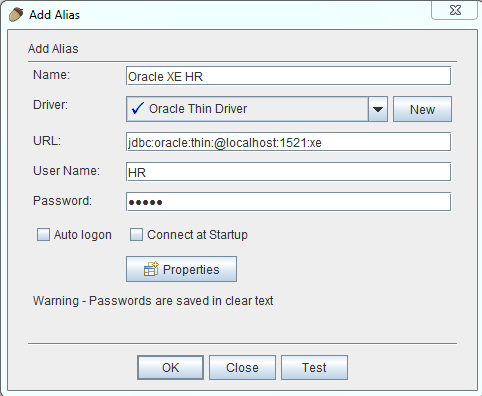
To accomplish this task select the “Aliases” tab on the left-hand side of Squirrel’s main screen, then click on the blue + (plus sign) icon. The “Add Alias” dialog will display:

Coonection Setup Dialog

Coonection Setup Dialog

From the driver’s drop-down list select the JDBC driver you installed in the previous step. Give the alias an arbitrary name that describes the instance you are connecting to, fill the missing details in the JDBC URL (hostname, port number, database name), enter user name and password, then click [Test] to test the connection. Adjust the parameters if necessary until the test succeeds. You now have the correct driver and connection parameters to use in your application or to configure a data source in your application server.

A Brief History of Objects

Most modern programming languages have support for Object-Oriented programming (OOP) but the OOP journey started back in 1967 with the appearance of Simula, the first programming language to use objects and classes.

As the name suggests, Simula was designed to perform simulations. Indeed it is useful to think of OOP as a way to simulate real-world entities (objects) in software.

Most real-world entities can be represented through their state and behaviour, and this is exactly what OOP does. For instance a Person class of objects will have state properties such as name and date of birth, and behaviour (or methods) such as celebrateBirthday.

In 1972 Smalltalk, based on Simula, was created for educational purposes at Xerox and in 1980 it became the first commercial release of an OOP environment.

In 1979 Bjarne Stroustrup began working on OOP enhancements to the C programming language, and in 1985 the C++ language was born bringing OOP into mainstream software development of large-scale commercial systems.

The complexity of C++ motivated a development team at Sun Microsystems to create a pure OOP language that was cross-platform and had automatic memory management, leading to the first release of Java to be announced in 1995.

And the rest, as they say, is history.

How to Implement a Simple HashSet in Java

In the first part of this post we discussed the design of hash-based collections and why classes must obey the general contract stipulated by the equals() and hashCode() methods of the java.lang.Object class. Now we will put in practice what we have discussed by writing a simple implementation of a HashSet in Java.

Our simple HashSet will implement the following interface:

import java.util.Iterator;

public interface SimpleSet {

    // Adds the specified element to this set if it is not already present
    boolean add(Object element);
    // Removes the specified element from this set if it is present
    boolean remove(Object element);
    // Returns true if this set contains the specified element
    boolean contains(Object element);
    // Returns an iterator over the elements in this set
    Iterator iterator();
    // Returns the number of elements in this set
    int size();
}

 
Now let’s move to the implementation details.

Since we will be adopting chaining to resolve collisions, we need an inner class that we can use to build a linked list of collided objects. We will call the inner class Entry.

public class SimpleHashSet implements SimpleSet {

    private static class Entry {
        Object key;
        Entry next;
    }

    // ...

 
The bucket array is an array of Entry instances. We also need a private property to store the size of the Set.

    private Entry[] buckets;

    private int size;

    // ...

 
Our simple HashSet constructor takes a single int argument which defines the capacity of the bucket array:

    public SimpleHashSet(int capacity) {

        buckets = new Entry[capacity];
        size = 0;
    }
    
    // ...

 
Next we need to define a hash function that computes the index into the bucket array giving the hash value of an object:

     private int hashFunction(int hashCode) {

        int index = hashCode;
        if (index < 0) { index = -index; }
        return index % buckets.length;
    }

    // ...

 
We can now start implementing the interface methods.

The algorithm for the add method first computes the index into the bucket array using our hash function.

If there is already one or more entries in that bucket location they are compared for equality with the object to add. If any of the comparisons is positive then the method returns false as a Set cannot store duplicates.

If no duplicates are found than a new Entry is created and assigned to the computed bucket location and linked to the chain if one exists. The size property is incremented and the method returns true to indicate that the object has been added to the Set.

    @Override
    public boolean add(Object element) {

        int index = hashFunction(element.hashCode());
        Entry current = buckets[index];

        while (current != null) {
            // element is already in set
            if (current.key.equals(element)) { return false; }
            // otherwise visit next entry in the bucket
            current = current.next;
        }
        // no element found so add new entry
        Entry entry = new Entry();
        entry.key = element;
        // current Entry is null if bucket is empty
        // if it is not null it becomes next Entry
        entry.next  = buckets[index];
        buckets[index] = entry;
        size++;
        return true;
    }

    // ...

 
The algorithm for the remove method also first computes the index into the bucket array using our hash function.

If there is already one or more entries in that bucket location they are compared for equality with the object to remove. If a match is found the object is removed and the chain, if present, adjusted. The size property is decremented and the method returns true to indicate that the object has been removed.

If no match is found then the method returns false, as there is nothing to remove.

    @Override
    public boolean remove(Object element) {

        int index = hashFunction(element.hashCode());
        Entry current = buckets[index];
        Entry previous = null;

        while (current != null) {
            // element found so remove it
            if (current.key.equals(element)) {

                if (previous == null) {
                    buckets[index] = current.next;
                } else {
                    previous.next = current.next;
                }
                size--;
                return true;
            }

            previous = current;
            current = current.next;
        }
        // no element found nothing to remove
        return false;
    }

    // ...

 
The algorithm for the contains method again first computes the index into the bucket array using our hash function.

If there is already one or more entries in that bucket location they are compared for equality with the object passed as argument. If a match is found the method returns true, otherwise it returns false.

    @Override
    public boolean contains(Object element) {

        int index = hashFunction(element.hashCode());
        Entry current = buckets[index];

        while (current != null) {
            // check if node contains element
            if (current.key.equals(element)) { return true; }
            // otherwise visit next node in the bucket
            current = current.next;
        }
        // no element found
        return false;
    }

    // ...

 
The iterator method simply returns an instance of an inner class that implements the java.util.Iterator interface.

    @Override
    public Iterator iterator() {
        return new SimpleHashSetIterator();
    }

    // ...

 
The code for the Iterator implementation follows:

    class SimpleHashSetIterator implements Iterator {

        private int currentBucket;
        private int previousBucket;
        private Entry currentEntry;
        private Entry previousEntry;

        public SimpleHashSetIterator() {
            currentEntry = null;
            previousEntry = null;
            currentBucket = -1;
            previousBucket = -1;
        }

        @Override
        public boolean hasNext() {

            // currentEntry node has next
            if (currentEntry != null && currentEntry.next != null) { return true; }

            // there are still nodes
            for (int index = currentBucket+1; index < buckets.length; index++) {
                if (buckets[index] != null) { return true; }
            }

            // nothing left
            return false;
        }

        @Override
        public Object next() {

            previousEntry = currentEntry;
            previousBucket = currentBucket;

            // if either the current or next node are null
            if (currentEntry == null || currentEntry.next == null) {

                // go to next bucket
                currentBucket++;

                // keep going until you find a bucket with a node
                while (currentBucket < buckets.length &&
                        buckets[currentBucket] == null) {
                    // go to next bucket
                    currentBucket++;
                }

                // if bucket array index still in bounds
                // make it the current node
                if (currentBucket < buckets.length) {
                    currentEntry = buckets[currentBucket];
                }
                // otherwise there are no more elements
                else {
                    throw new NoSuchElementException();
                }
            }
            // go to the next element in bucket
            else {

                currentEntry = currentEntry.next;
            }

            // return the element in the current node
            return currentEntry.key;

        }

    }

    // ...


The implementation of the size method simply returns the value of the size property:

    public int size() {
        return size;
    }

    // ...

 
Finally we override the java.lang.Object toString method to produce a visual representation of our HashSet.

    @Override
    public String toString() {

        Entry currentEntry = null;
        StringBuffer sb = new StringBuffer();

        // loop through the array
        for (int index=0; index < buckets.length; index++) {
            // we have an entry
            if (buckets[index] != null) {
                currentEntry = buckets[index];
                sb.append("[" + index + "]");
                sb.append(" " + currentEntry.key.toString());
                while (currentEntry.next != null) {
                    currentEntry = currentEntry.next;
                    sb.append(" -> " + currentEntry.key.toString());
                }
                sb.append('\n');
            }
        }

        return sb.toString();
    }

    // ...

 
The full source code can be found on GitHub at the following URLs:

SimpleSet (interface)
SimpleHashSet (implementation)
SimpleHashSetTest (unit tests)

This is of course a very basic implementation of a HashSet in Java. It is useful to study and understand the main principles behind hash-based collections, or to code on interviews to demonstrate your knowledge of a hash-based data structure and its algorithms.

If you want to study a production quality implementation with all the required optimizations, I suggest that you take a look at the source code of java.util.HashSet. To find out how to look at the Java library source code in Eclipse please read this post.

Thank you for reading, feel free to post any questions or comments.

Free Git and GitHub book

A Practical Guide to Git and GitHub
My new book A Practical Guide to Git and GitHub for Windows Users is officially available on Amazon!

I am giving it away for free to all my blog readers. This offer expires on Thursday 30 June so make sure you grab your copy now before the price goes up! (normal RRP $4.99).

The coolest open source projects today are hosted on GitHub and everyone is adopting Git as the version control system for new projects, so these are must-have skills for all software professionals.


I wrote this book with the intent to helping Windows users to learn Git and GitHub skills in an easy, interactive and professional way. I hope you will find it useful.

Since its launch it has already ranked in the top 100 paid best sellers in the Computing > Programming and Databases categories on Amazon. Grab your free copy now! Here is the link:

https://www.amazon.com/dp/B01GO8ZVFA/

And don’t forget to tell your friends too!

P.S.: If you enjoy the book and find it helpful please leave a review on Amazon after you have read it. Thank you!

Hash-based collections and the Object class

Nick Bit and Dick Byte are aspiring computer scientists, always up to something. This time they get to grips with hash-based collections.

Nick: “Hey dude, let’s build a data structure in Java that does everything in O(1)”
Dick: “Sounds cool. You can’t get any better than constant time”

[Nick and Dick are of course talking about algorithm time complexity measure and the Big O notation]

Dick: “Where do we start?”
Nick: “We could build it on top of an array. If you know the index of an element in the array you can do everything in O(1)”
Dick: “What do you mean?”
Nick: “Take a look at this code. Knowing the index allows me to insert, access and delete an entry in constant time”

int apple_index = 4;

String[] fruits = new String[24];
String apple = "Apple";
// insert
fruits[apple_index] = apple;
// access
String lunch = fruits[apple_index];
// remove
fruits[apple_index] = null;


Dick: “I see… but how do we relate an object with an integer number that we can use as the index into the array without hard-coding it?”
Nick: “ As it happens the java.lang.Object class already provides this mechanism for us with the hashCode() method. It attempts to return distinct integers for distinct objects”
Dick: “Cool. So if we have an array big enough we can store any object in it using the hash code as the index and get constant time performance for all operations!”
Nick: “Let’s do it. Why don’t you start writing the code while I get us a coffee?”
Dick: “OK”

[Dick gets started with the code, but don’t try this at home]

Object[] objArray = new Object[Integer.MAX_VALUE];
String banana = "Banana";
objArray[banana.hashCode()] = banana;


Nick: “I am back”
Dick: “Wow! I think I just blew the JVM…”
Nick: “Let me see”

Exception in thread "main" java.lang.OutOfMemoryError: 
Requested array size exceeds VM limit

   at com.nickanddick.App.main(App.java:7)
   at sun.reflect.NativeMethodAccessorImpl.invoke0(Native Method)
   at sun.reflect.NativeMethodAccessorImpl.invoke(NativeMethodAccessorImpl.java:62)


Nick: “That’s daft. We are asking the JVM to allocate memory for 2^16 object instances. That’s more than 2 billion objects!”
Dick: “Wow! That’s a lot of memory”
Nick: “We have been concentrating on time complexity but forgot to take space complexity into consideration”
Dick: “That’s efficient memory usage, right?”
Nick: “Right. We don’t really need an array this big. We just need an array big enough to contain the number of elements required by a particular application”
Dick: “But if we use a smaller array, what happens if the hash code returned for an object is outside the array bounds?”

[Good question. It is time we give Nick and Dick some help]

Bucket Arrays and Hash Functions

To efficiently implement their data structure they need the two fundamental components of a hash-based collection: a bucket array and a hash function.

A bucket array is an ordinary array of a pre-defined capacity (number of elements).

A hash function is a function that translates the hash code of an object into a bucket array index. A simple hash function could for example determine the index by finding the remainder of the division of the hash code by the bucket array length like this:

index = hashCode % array.length

[The % operator is called the remainder or modulus operator]

There a number of considerations to take into account when implementing a hash-based collection.

Collisions

Hash-based collections do not store duplicate values, as duplicate values yield the same index into the bucket array.

There is however a problem. It is possible that a hash function returns the same index for different objects. Suppose we have a bucket size of 128 and we want to add to it two objects obj1 and obj2 whose hash codes are respectively 138 and 266. Applying the simple hash function defined above yields:

Array index for obj1 = 138 % 128 = 10
Array index for obj2 = 266 % 128 = 10

When the hash function returns the same index location for different objects we have what is called a collision. One way to deal with collisions is to use a simple technique called chaining. It works by storing a linked list of objects allocated to the same bucket array index. We will see how that works in practice in the next post.

Load Factor

The probability of collisions is proportional to the capacity of the bucket array. Larger bucket arrays will produce a smaller number of collisions for a given hash function. The relation between the number of elements in a hash collection and the size of the bucket array is called the load factor of the hash collection.

A hash collection with a smaller load factor will produce a smaller number of collisions and therefore will be more efficient.

Object.hashCode() and Object.equals()

Classes whose instances are meant to be used in a hash-based collection should override both the hashCode() and equals() methods of java.lang.Object and obey their general contracts.

The implementation of hashCode() in java.lang.Object returns distinct integers for distinct objects (as much as it is reasonably practical) even when the objects are logically equal and therefore might not produce the expected result when used in a hash-based collection.

https://docs.oracle.com/javase/8/docs/api/java/lang/Object.html#hashCode–

Likewise, the java.lang.Object implementation of equals() is not ideal as an object is only equals to itself, and should be overriden.

https://docs.oracle.com/javase/8/docs/api/java/lang/Object.html#equals-java.lang.Object-

The general contract and algorithms for overriding hashCode() and equals() are described at length in Effective Java by Joshua Bloch. The key rule is that equal objects must have equal hash codes.

In practice all the major IDEs are capable to generate reasonably correct hashCode() and equals() methods for a class.

Other Considerations

Classes whose instances are meant to be used as keys in a Hash Map should also be immutable. It is recommended that the class also implements the java.lang.Comparable interface.

A Simple Hash Set Implementation

In the second part of this post we will look at a simple HashSet implementation to see how it all hangs together in practice. See you then.

Towards Functional Java: Closures

This is the third post in the Towards Functional Java series. In the previous posts we examined how to dynamically define functions for later execution using method references and lambda expressions. The capability to create and manipulate functions at runtime is at the core of functional programming.

Sometimes a lambda expression may access variables that are defined outside of its scope. These are called free variables. Consider the following code:

public class Printer {
	
  public void printSubstring(String text, int beginIndex, int endIndex) { 
    Runnable r = () -> {
      System.out.println(text.substring(beginIndex, endIndex));
    };	
    new Thread(r).start();
  }

  public static void main(String[] args) {
    Printer printer = new Printer();
    printer.printSubstring("Hello!", 0, 4);
    printer.printSubstring("My name is John", 3, 10);
    printer.printSubstring("How are you today?", 4, 11);
  }
}


The Runnable implementation accesses three variables that are not defined in the scope of the lambda expression: text, beginIndex, endIndex. These variables are defined in the scope of the enclosing printSubstring method which may have terminated by the time the thread is executed. Normally when a method completes execution its local variables are removed from memory.

The program however executes correctly and the lambda expression somehow retains the values of the enclosing method arguments. A function or block of code along with the captured values of its associated free variables is called a closure.

Java lambda expressions are therefore closures but with an important restriction: they only close over values but not variables. If we try to modify the value of a free variable inside a lambda expression we get a compiler error. Let's modify the Runnable implementation slightly to demonstrate this:

Runnable r = () -> {
  System.out.println(text.substring(beginIndex, endIndex--));
};	


We have tried to decrement the value of the free variable endIndex in the lambda expression. The compiler complains with the following message:

Local variable endIndex defined in an enclosing scope must be final or effectively final

Although it is not required that free variables be declared final, effectively they are not allowed to change. In other functional programming languages there is no such restriction, but Java had to reach a compromise since to implement “real closures” would require a massive effort and possibly compromise backward compatibility and/or support for other JVM languages.

The “closure for immutable variables” implemented by Java 8 lambda expressions is a pragmatic solution that still achieves function portability without causing too much inconvenience to the programmer.

In the next post of this series we will look at more Java 8 functional features. Feel free to leave any comments or suggestions. Thank you for reading.