
Experienced developers know that learning to write robust, clean and efficient code in a new programming language takes a long journey. There is a famous quote from the Chinese philosopher Lao Tzu (571 – 531 BC) that says:
“The journey of a thousand miles begins with a single step”
The purpose of this tutorial is to help you take that difficult first step as quickly and easily as possible. To achieve that, we will create a Scala command-line application, and use it to introduce some language features and syntax. At the end of this tutorial you will be in a position to write useful Scala programs, and easily progress with your learning at your own pace afterwards.
Prerequisites
You need to have a Java Runtime Environment (JRE or JDK) version 6 or later installed on your machine. But I expect, being a Java programmer, you already have one (or know how to get it!) Just like Java, Scala code is compiled into Java byte code, and executed by the Java Virtual Machine (JVM).
Scala IDE
The fastest way to get started is to install the Scala IDE (based on Eclipse). You can download the binaries for your OS (Windows, Mac or Linux) from:
For Windows, the download is a ZIP archive. To install, extract the files and open the “eclipse” folder. Create a shortcut to eclipse.exe and place it on your desktop. Double-click the shortcut to start the IDE; accept the default workspace location (where project files are stored) or specify a different one of your choice. Do not worry if you are not familiar with Eclipse, step-by-step instructions are provided below.
Creating Your First Scala Project
Once the Scala IDE is up and running, select:
File -→ New -→ Scala Project
In the dialog, enter the project name e.g. scala-tutorial, accept all defaults and click on [Finish]. In the “Package Explorer” view, you should see your new project created.
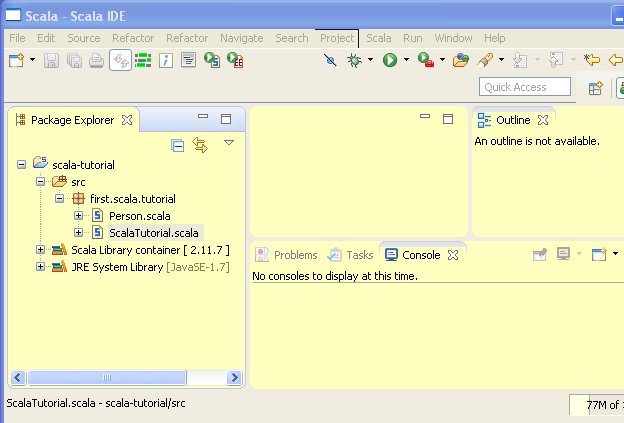
The Scala IDE
Right-click on the “src” folder, select New -→ Package. Type the name of the package e.g. first.scala.tutorial and click [Finish]. The new package should appear in the Package Explorer view.
Now right-click on the first.scala.tutorial package and select New -→ Scala Object. Type the name of the object e.g. ScalaTutorial and click [Finish]. The new source file should appear in Package Explorer, and open in the editor area.
The ScalaTutorial object we just created is a singleton object. We are going to define now the entry point of our application. For this, we need to define a main method with the appropriate signature inside our ScalaTutorial object.
Here is the code:
package first.scala.tutorial

object ScalaTutorial {
  def main(args: Array[String]){
    println("Hello from Scala")
  }
}
The only instruction inside the main method just prints the String “Hello from Scala” to the standard output. Do not worry about the syntax details, we will get to these in a minute. Let’s run the application first. Right-click ScalaTutorial.scala in Package Explorer, and select Run -→ Run As -→ Scala Application. You should see the string “Hello from Scala” printed out in the console view. Congratulations! You just wrote your first Scala program.
Code Analysis
As you know, in Java the entry point of a command-line application is the static void “main” method in a public class that takes an array of strings as parameter. In Scala, it is a “main” method in a singleton object that also takes an array of strings as parameter. There is no concept of static members in Scala classes; Scala uses singleton objects instead.
In Scala, methods are defined with the “def” keyword. Note that there is no return type specified in the “main” method declaration. In Scala this is optional: the compiler works it out. The “main” method has return type “Unit”, which is the equivalent to a Java method with the return type “void”.
Finally, notice that there is no semicolon at the end of the println statement inside the method; in Scala this is also optional (it is called semicolon inference). You only need to explicitly end a statement with a semicolon if you place more than one statement in the same line, e.g.:
statement1; statement2; statement3
Before we continue, a good reference to have at hand is the Scala API which can be found at:
http://www.scala-lang.org/api/current/
The API documentation describes all the classes, objects and traits (interfaces) in the standard Scala library.
Vars and Vals
Scala has two types of variables: vals and vars. A val is like a final variable in Java, and a var is like a non-final variable (i.e. can be reassigned).
In Scala you do not need to specify the variable type, the compiler works it out. But don’t be fooled by that: Scala is a strongly typed language, just like Java. Unlike Java that uses primitive types and wrappers, all values in Scala are objects, including numerical values and functions. Therefore, all values are instances of a class.
Let’s write some code with vars and vals inside our main method:
    // vars and vals
    val myval = "first"
    // compiler will complain
    //myval = "second"
    // reassigning a var is ok
    var myvar = "first"
    myvar = "second"

    var x = 5

    println(myvar.getClass.getName)
    println(x.getClass.getName)
If you try to reassign the value of myval, because it is final, the compiler will complain. But you can freely reassign the value of myvar. The println calls show the class names of the variables. Run the application again, and check the output to the console window.
Function Literals
Before we proceed, let’s introduce some terminology. Conventionally, a procedure is simply a function with a result type of Unit (void). If a function returns anything other than Unit, it is called, well, a function. If a function or procedure is a member of class, it is called a method.
Now let’s try something more interesting, and pass a few command-line parameters to our application. To do that, select Run → Run Configurations from the IDE menu. You should see the following dialog:
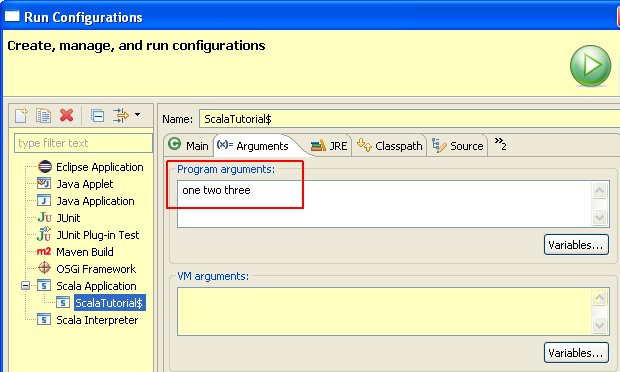
The Scala IDE Run Configurations Dialog
Select the “Arguments” tab, and type a few strings in the “Program arguments” field, e.g. one two three. Click [Apply] and then [Close].
We can now modify our main method to print out the arguments passed to the program. Add the following code:
    // function literals
    if (args.length > 0) {
      args.foreach(println)
    }
The foreach method is implemented by all traversable Scala collections. It takes a procedure as parameter, and applies the procedure to each collection element. In this case, we are passing the println procedure to it; the result is that when you run the application now, you will see each argument that you have passed to the program printed to the console. Try it.
In Scala functions/procedures/methods are values that can be passed around. This forms the basis of functional programming.
Because they are values, function literals can be assigned to a variable. Add now the following code to the main method:
    // function literals
    var increment = (x:Int) => x+1
    println(increment(10))
Here, we are assigning a function literal to the variable “increment”. The syntax to construct a function literal is a list of named parameters and their types in parenthesis e.g. (x:Int), followed by a right arrow (or rocket) operator =>, followed by the body of the function e.g. x+1.
The next statement passes the value 10 to our increment function variable which is passed to the println procedure. If you run the application now, this statement prints the value 11 (10+1) to the console, as you would expect.
Classes
Like Java, Scala is a class-based language. It is always useful to refer to the Scala type hierarchy, which is documented here:
http://docs.scala-lang.org/tutorials/tour/unified-types.html
To conclude this introduction, we are going to write a Scala class. On the IDE, right-click the package first.scala.tutorial (or whatever you have called it) and select New -> Scala Class. In the dialogue, type the name of the class, Person, and click on [Finish]. A new source file named Person.scala appears in Package Explorer, and should be opened in the Editor window with an empty class declaration.
Let’s implement this class with the following code:
package first.scala.tutorial

class Person(a: Int) {

  private var age: Int = a;

  // no params constructor
  def this() = {
    this(0)
  }
  // a method
  def birthday() : Unit = {
    age += 1
  }
  // overriden method from class Any
  override def toString =
    "I am " + age + " years old"

}
Our Person class has a single property, “age”, defined as a var of type Int. Notice that in Scala the constructor is defined as part of the class declaration, following the class name, in this case (a: Int)
We have also defined an additional no parameter constructor in the body of the class, using the keyword “this” (it instantiates a Person with a default age of zero). The “this” keyword is used to define constructors inside the body of a class.
Then, we define a method “birthday” that, when called, increments the age of the Person by one. Notice the syntax. The method takes no parameters, and returns Unit (void).
Finally, we override the toString method, defined in the Scala top-level class “Any”, so that it prints the age of the Person in a verbose manner. Again notice the syntax: overridden methods are declared with the keyword “override”.
We are now ready to test our new class. Let’s go back to our main method in ScalaTutorial.java, and add the following code:
    // classes
    val adult = new Person(40)
    adult.birthday
    adult.birthday
    println(adult)

    val baby = new Person
    baby.birthday
    baby.birthday
    println(baby)
Here we instantiate two Person objects. The first instance, “adult”, uses the single parameter constructor. The second, “baby”, is instantiated using the no parameters constructor. On each instance we call the “birthday” method twice, and invoke the overridden version of toString.
If we run the program, what would you expect to be printed to the console? Give it a try, and check that the output is what you expected to see.
Next Steps
There are many features of Scala that we have not covered in this quick introduction: traits, assertions, collections, pattern matching, extractors, annotations, actors… but you should be equipped now to continue the exploration on your own. That was our objective: to get you started.
To continue with your learning, I suggest that you take a look at the all the various Scala constructs illustrated in the official Scala website, at the following address:
http://docs.scala-lang.org/tutorials/tour/tour-of-scala.html
You can explore each feature by adding code to the simple command-line application that we have built and test it.
I also recommend the excellent book Programming in Scala by Martin Oderski, who is the creator of the language. It is a clear and complete Scala reference, and an excellent programming text.
I hope you have found this tutorial to be useful, and I would appreciate your comments. Thank you for reading, and good luck with your learning!
Thanks. Intro is just the way it should be, basic confidence building measure.
Cheers!!
Nice Introduction. Quite Useful. Thanks!
very Good
thank you for the short and sweet introduction, just what i needed to get going with a new project!