
This is the second part of the tutorial:
Setting Up a Java 8 Development Environment with Maven and Eclipse
It covers the installation of the Eclipse IDE.
Prerequisites: you need to complete Part 1 of this tutorial first.
Installing the Eclipse IDE
An Integrated Development Environment (IDE) is an essential tool to write and debug code professionally. Here we will be covering the installation and configuration of Eclipse which is a very capable and popular IDE. The other two most popular IDEs for Java at the time of writing are IntelliJ Idea (which requires a commercial license) and Netbeans. I picked Eclipse because it is the one you are most likely to encounter in professional projects.
Eclipse installation is simple, but the IDE does need to be configured properly to make it work with the JDK and Maven we have installed in Part 1.
Let’s start by downloading the Eclipse package, which you can find at:
https://eclipse.org/downloads/
Note: if the URL has changed, just type “Eclipse IDE download” on your favourite search engine to find it.
There are two ways of installing Eclipse in Windows: using the installer, or by downloading the ZIP file. We will be covering Eclipse installation using the ZIP file.
There are several Eclipse packages in the download page to choose from. For core Java development, I recommend the “Eclipse IDE for Java Developers” package as it is leaner and faster than the package for Java EE. Download the ZIP file for your version of Windows i.e. 32 or 64 bit. At the time of writing, the current release version is Eclipse 4.5 codenamed Mars. It is ready for Java 8 development and has built-in Maven support (the Maven plugin comes pre-installed). The next release, 4.6 (Neon) is planned for June 2016. Eclipse has a regular annual release on June of each year.
Once the download is complete, extract the contents of the ZIP file into an installation directory of your choice. Again, I recommend directory names with no spaces. On my machine, I have installed Eclipse in C:\apps\eclipse.
If you look inside the installation directory, you should see something like the following (it may vary a little if your version is different).
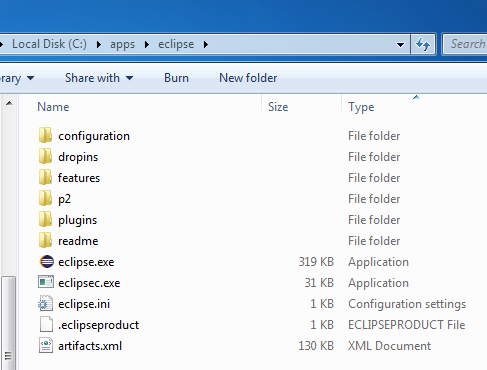
The Eclipse Mars installation directory
Before we start Eclipse, there are a couple of things we need to do.
First, we need to tweak the Eclipse startup parameters in the file eclipse.ini (make a backup copy before you edit it). We need to specify which JVM should run Eclipse and increase the JVM heap size.
To specify which JVM runs Eclipse, add a –vm entry just before the –vmargs parameters and give it the value of the JDK installation directory we did in Part 1, followed by bin/javaw.exe. To increase the heap size used by Eclipse, change the –Xms and –Xmx values. This is what the last lines of my eclipse.ini look like:
-vm
C:\apps\jdk1.8.0_45\bin\javaw.exe
-vmargs
-Dosgi.requiredJavaVersion=1.7
-Xms1024m
-Xmx1024m
The second thing we need to do is to create a directory that will serve as the Eclipse workspace. This is where Eclipse will store the projects data. On my machine I have created C:\data\dev\eclipse for this purpose. It is possible to have more than one workspace and switch between them if needed.
We are ready now to start Eclipse. Create a shortcut to eclipse.exe on your desktop, and double click it to start the IDE. On startup, after the splash screen, it will ask to specify your workspace location. Browse to the folder location you just created to select it, and click OK.
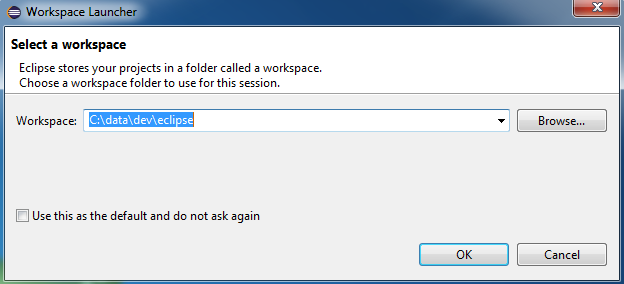
The Eclipse workspace dialog at startup
Once the Eclipse IDE is up and running, we need to configure it so that it works with the JDK and Maven installations we completed in Part 1.
Select Window → Preferences from the main menu, then Java → Installed JREs from the Preferences window. Click on [Add…], select “Standard VM”, [Next], click on [Directory…], and navigate to the location of the JDK you have installed in Part 1 of this tutorial. Accept all defaults and click on [Finish]. Make sure you select the checkbox next to it to make it the default Java Runtime Environment.
Keep the Preferences dialog open. Select Maven → Installations, click on [Add…], then [Directory…], navigate to the location of your Maven installation as per Part 1, click on [Finish], select the checkbox next to your installation to make it the default one, then click [Apply][OK].
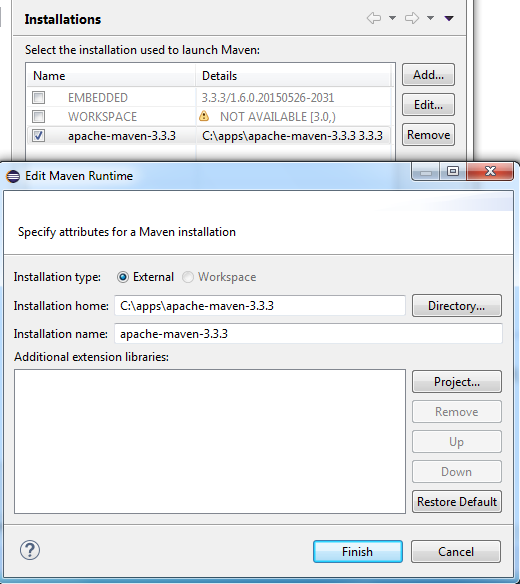
Configuring Maven in Eclipse
Now click on Maven → User Settings, under “User Settings” click [Browse…] and navigate to the location of your Maven configuration file settings.xml, located in the conf directory of your Maven installation as per Part 1. It should automatically update the “Local Repository” field from the configuration.
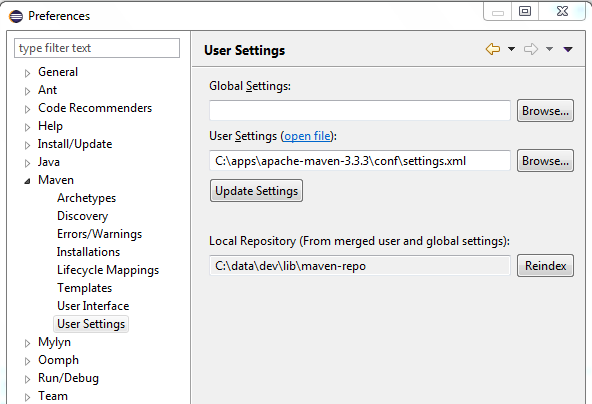
Maven user settings configuration
Click on [Apply] and then [OK].
We are done now with the Eclipse settings, and we are ready to import the Maven project we generated in Part 1 of this tutorial into the IDE to play with it.
Select File → Import from the Eclipse menu, expand Maven and select “Existing Maven Projects”, then click [Next>]
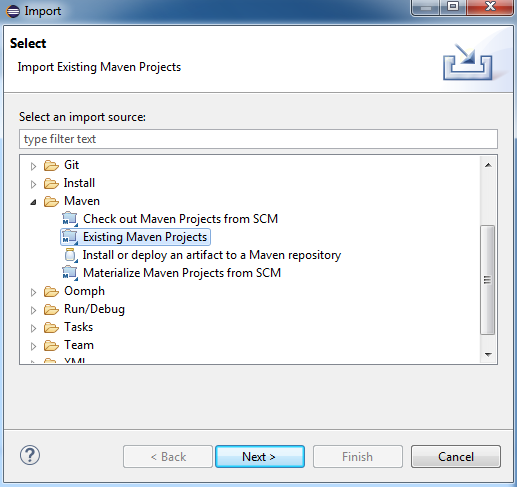
Importing a Maven project into Eclipse
In the “Root Directory” field, click [Browse…] and navigate to the location of you Maven project, then click on [Finish]
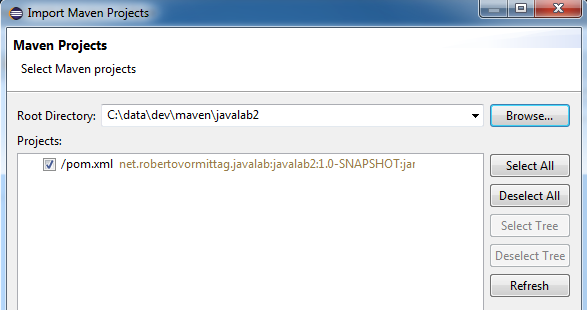
Importing a Maven project into Eclipse
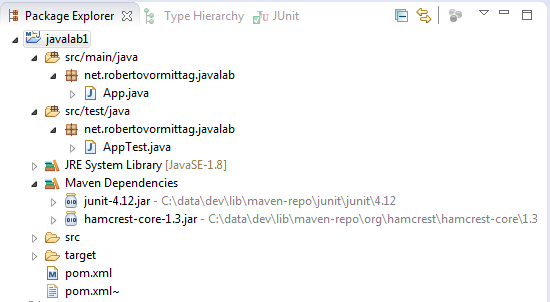
Your Maven project should appear in the “Package Explorer” view:
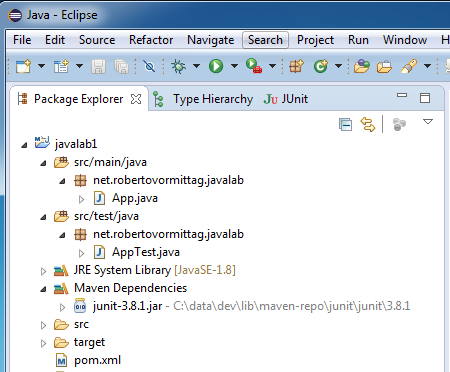
The Maven project in Package Explorer
To verify that it is all working and correctly setup, let’s play with our new project. Expand the “main” and “test” packages, and take a look at the source files, App.java and AppTest.java (double click to open in editor). It is a very simple “Hello World” program with a unit test that always succeed.
Right-click the project name (in my case javalab1) and select Run As → Maven Test (this is the equivalent of running mvn clean test from the command line). You should see the Maven output in the Console window of Eclipse.
Now right-click on the App.java source, and select Run As → Java Application, you should see the output in the Console window of Eclipse.
Now right-click on the AppTest.java source, and select Run As → JUnit Test, you should see the test result of the only test method showing in the JUnit view:
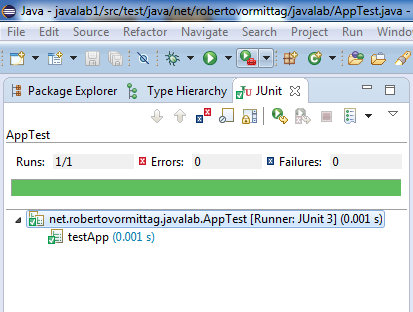
The Eclipse JUnit view
As you can see, we have now a way to write and run tests from the IDE, or from the command line with Maven (as we did in Part 1). We are ready for TDD. Your development environment setup is now complete.
To conclude this tutorial, we are going to see how easy it is to manage dependencies with Maven. The archetype project we generated uses an older version of JUnit. We are going to update this, and re-write the tests using the more modern annotations style.
To do this, open the POM file (pom.xml) in the editor. My POM looks like this:
<project xmlns="http://maven.apache.org/POM/4.0.0" xmlns:xsi="http://www.w3.org/2001/XMLSchema-instance"
  xsi:schemaLocation="http://maven.apache.org/POM/4.0.0 http://maven.apache.org/maven-v4_0_0.xsd">
  <modelVersion>4.0.0</modelVersion>
  <groupId>net.robertovormittag.javalab</groupId>
  <artifactId>javalab1</artifactId>
  <packaging>jar</packaging>
  <version>1.0-SNAPSHOT</version>
  <name>javalab1</name>
  <url>http://maven.apache.org</url>
  <dependencies>
    <dependency>
      <groupId>junit</groupId>
      <artifactId>junit</artifactId>
      <version>3.8.1</version>
      <scope>test</scope>
    </dependency>
  </dependencies>
  <properties>
    <maven.compiler.source>1.8</maven.compiler.source>
    <maven.compiler.target>1.8</maven.compiler.target>
  </properties>
</project>
Under dependencies, you can see that there is a element for junit version 3.8.1. We are going to change this to 4.12 (the current version at the time of writing). Change the value of the <version> element, save the POM file, and update the project: right-click on the project name (javalab1 in my case), and select Maven → Update Project…, then [OK]. If you expand now the “Maven Dependencies” tree in Package Explorer, the library has changed to junit 4.12 and the hamcrest core library which is a junit 4 dependency has been downloaded automatically for you.
Maven magic!
jUnit library updated with Maven
We can re-write our test class AppTest.java using the cooler JUnit 4 syntax. Here is the code:
package net.robertovormittag.javalab;

import java.util.List;
import java.util.ArrayList;

import org.junit.After;
import org.junit.AfterClass;
import org.junit.Before;
import org.junit.BeforeClass;
import org.junit.Test;

import static org.junit.Assert.assertEquals;
import static org.junit.Assert.assertTrue;


/**
 * Unit test for class App.
 */
public class AppTest

{
	private List list;

	/* runs once before all tests */
    @BeforeClass
    public static void beforeClassSetUp() {
    	System.out.println("@BeforeClass");
    }

    /* runs once after all tests */
    @AfterClass
    public static void afterClassTearDown() {
    	System.out.println("@AfterClass");
    }

    /* runs before every test */
    @Before
    public void setUp() {
        list = new ArrayList();
        System.out.println("@Before");
    }

    /* runs after every test */
    @After
    public void tearDown() {
        list.clear();
        System.out.println("@After");
    }

    /* test case */
    @Test
    public void testEmptyList() {
        assertTrue(list.isEmpty());
        System.out.println("@Test:testEmptyList");
    }

    /* another test case */
    @Test
    public void testOneItemList() {
        list.add("one");
        assertEquals(1, list.size());
        System.out.println("@Test:testOneItemList");
    }

}
This code demonstrates the most common annotations used in JUnit 4. You can define static methods that run before and after all tests in the class with @BeforeClass and @AfterClass. You can also define methods that run before and after each test with @Before and @After. And of course, you can define as many test methods you need with @Test. Because our simple application App.java is not doing anything other than a System.out there is no functionality to test at the moment, but you can use this test class as a template as you add more functionality to the application.
Before running the new test class, we need to make sure Eclipse is using the JUnit 4 runner. From the Eclipse menu, select Run → Run Configurations, expand JUnit, select AppTest, in the “Test” tab make sure “Test runner” is set to “JUnit 4”. Click on [Apply], then [Run]
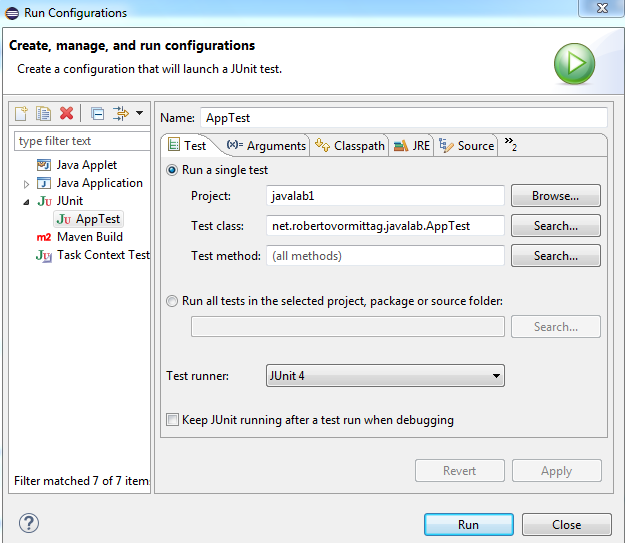
Changing the JUnit runner in Eclipse
You should see your new tests passing on the jUnit view (green bar). Try also to run the tests from the command line with the mvn clean test command as we did in Part 1. You shoud get an output similar to this:
-------------------------------------------------------
 T E S T S
-------------------------------------------------------
Running net.robertovormittag.javalab.AppTest
@BeforeClass
@Before
@Test:testEmptyList
@After
@Before
@Test:testOneItemList
@After
@AfterClass
Tests run: 2, Failures: 0, Errors: 0, Skipped: 0, Time elapsed: 0.114 sec

Results :

Tests run: 2, Failures: 0, Errors: 0, Skipped: 0

[INFO] ------------------------------------------------------------------------
[INFO] BUILD SUCCESS
[INFO] ------------------------------------------------------------------------
[INFO] Total time: 8.165 s
[INFO] Finished at: 2015-10-01T18:21:01+01:00
[INFO] Final Memory: 11M/29M
[INFO] ------------------------------------------------------------------------
Congratulations! You have now successfully setup a professional Java 8 development environment for test-driven development. You can run tests interactively from the Eclipse IDE as you write code, and automate test runs from the command-line with Maven before packaging and deployment. Maven will only package the project for deployment if all tests pass.
This concludes the tutorial:
Setting up a Java 8 Development Environment with Maven and Eclipse