
This is the first part of the tutorial:
Setting Up a Java 8 Development Environment with Maven and Eclipse
It covers the installation of the JDK and Maven. Let’s start with the JDK first.
Installing the Java Development Kit (JDK)
The first thing we need to do is to install the JDK version 8 or later. The JDK contains the Java Runtime Environment (JRE) also known as the Java Virtual Machine (JVM), the Java byte code compiler, and a bunch of other tools and utilities. Version 8 (since March 2014) is a major JDK release as it brings functional-style programming to Java.
Do not worry if you have previous versions of the JDK or JRE installed, we will configure Maven and Eclipse to work with the version of the JDK we are going to install, which you can download from the Oracle website, located at:
http://www.oracle.com/technetwork/java/javase/downloads/index.html
Note: if the URL has changed, just type “JDK download” on your favourite search engine to find it.
At the time of writing, the current stable release is Java SE 8u45 i.e. Java Standard Edition version 8 update 45. Follow the easy installation instructions on the Oracle website. I recommend changing the default installation path, usually “C:\Program Files\…” to a directory name without spaces e.g. “C:\apps\…”
Once the installation is complete, let’s verify it. Navigate to the JDK directory you have specified during installation. In my case is C:\apps\jdk1.8.0_45
You should find a directory structure similar to this:
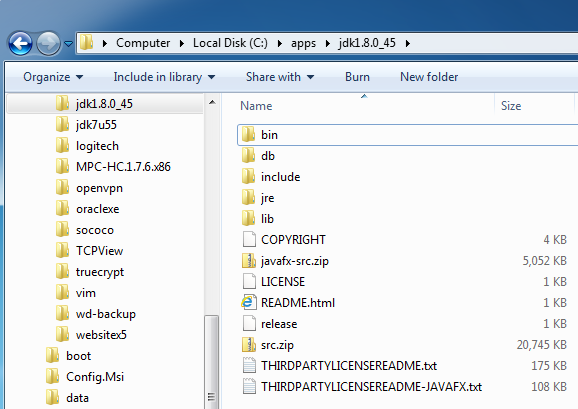
The installation directory of JDK 8
Now we need to set an environment variable called JAVA_HOME that points at this directory. This variable is used by several Java-based tools and services. To do that on Windows, open Contro Panel, and select:
System and Security → System → Advanced System Settings
A dialog will pop up. Select the “Advanced” tab, and click on [Environment Variables…]. In the System Variables area, click on [New…], enter the variable name JAVA_HOME and set the value to be your JDK installation directory. Click [OK] when done and close all parent windows.

Setting up the JAVA_HOME environment variable on Windows
This concludes the installation of the JDK, we are ready now to install Maven.
Installing Maven
Defining Maven as a build tool is quite an understatement. With Maven you can run tests and applications from the command line, quickly create a Java project from hundreds of existing archetypes for various architectures, generate documentation and much more. But the single most useful Maven feature is dependency management. Most Java enterprise projects rely on hundreds of dependencies (libraries) and before Maven came along managing them was known as “jar hell”. Not anymore. You simply specify the dependencies you need for a project on a configuration file, and Maven takes care of downloading and installing them from central repositories available on the Internet. For these reasons it is no surprise that Maven has become the de facto Java project management tool of choice for professional developers.
Before installing Maven, you must have completed the JDK installation described above, as Maven relies on the JDK and reads the value of the JAVA_HOME variable to find it. To verify that JAVA_HOME has been set correctly, open a DOS command prompt and type:
echo %JAVA_HOME%
The output should be the path to your JDK installation.
To install Maven, first download the binary ZIP archive from the Apache project website located at:
https://maven.apache.org/download.cgi
Note: if the URL has changed, just type “Maven download” on your favourite search engine to find it.
At the time of writing, the current version is 3.3.3. Extract the archive in a directory of your choice. Again, I recommend a directory path with no spaces in the name e.g. C:\apps
You should get the following directory structure:
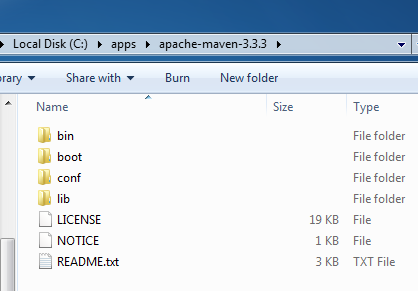
The Maven installation directory structure
Now we need to add the bin directory to the PATH environment variable. Follow the same process described in the previous step to set the JAVA_HOME variable, but this time instead look for a variable named PATH, select it and click on [Edit…]. Append the path to the Maven bin directory at the end of the value field after a semicolon, as illustrated below.
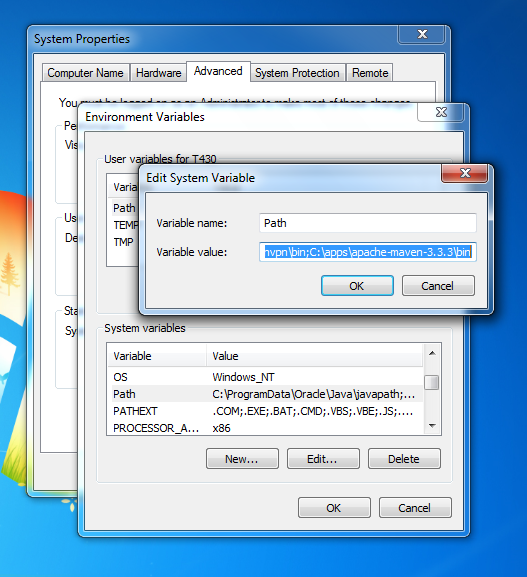
Adding Maven to the PATH in Windows
Click [OK] when done and dismiss all parent windows.
We are ready now to verify the installation. Open a fresh DOS command prompt window, and type mvn –-version where mvn is the Maven executable. You should see something similar to the following output:
C:\Users\T430>mvn --version
Apache Maven 3.3.3 (7994120775791599e205a5524ec3e0dfe41d4a06; 2015-04-22T12:57:3
7+01:00)
Maven home: C:\apps\apache-maven-3.3.3\bin\..
Java version: 1.8.0_45, vendor: Oracle Corporation
Java home: C:\apps\jdk1.8.0_45\jre
Default locale: en_GB, platform encoding: Cp1252
OS name: "windows 7", version: "6.1", arch: "x86", family: "dos"
Check that Java home and Java version match the JDK you have installed in the previous step.
Next we need to create a directory that Maven will use as a local repository. This is where all the dependencies (jar files) for Maven and your projects will be installed locally. You can create and name the directory anyway you like, in my case it is C:\data\dev\lib\maven-repo
Finally we need to tweak the Maven configuration file, settings.xml, located in the conf directory of the Maven installation. I recommend making a backup copy of the original file just in case. There are two items that we need to configure: the location of the local repository (the directory you created in the previous step) and the location of a mirror that Maven will use to download dependencies from.
In my case, the local repo is set like this:
<!-- localRepository | The path to the local repository maven will use to store artifacts. | | Default: ${user.home}/.m2/repository <localRepository>/path/to/local/repo</localRepository> -->
<localRepository>C:\data\dev\lib\maven-repo</localRepository>
Set the mirror element to point to the official Maven repository. There is one hosted in the US and one in the UK. My settings.xml is configured with the UK mirror:
<mirror>
   <id>UK</id>
   <name>UK Central</name>
   <url>http://uk.maven.org/maven2</url>
   <mirrorOf>central</mirrorOf>
</mirror>
For more details on the mirror settings you can refer to this document:
https://maven.apache.org/guides/mini/guide-mirror-settings.html
Save the changes to settings.xml and exit the editor.
We are ready to create our first Maven project. We will ask Maven to create a prototype for a Java command line application. I will use this prototype often in other blog posts to experiment with Java features, as it creates the standard directory structure to support test-driven development (TDD). Maven projects can be imported on any Java IDE, including Eclipse which we will be installing and configuring in Part 2 of this tutorial.
First, create a directory where you want to store your Maven projects. Name it as you wish, with the usual recommendation to avoid spaces in directory names. On my machine I have created C:\data\dev\maven for this purpose.
The command we will going to run is the following:
mvn archetype:generate -DgroupId=net.robertovormittag.javalab -DartifactId=javalab1 -DarchetypeArtifactId=maven-archetype-quickstart -DinteractiveMode=false
I suggest you copy the above command into a text editor, and customize the following parameters:
artifactId: this is the name of the jar file (the end product of this project) without version information; it will also be used for the project name later in Eclipse.
groupId: this has to be unique to identify your projects, so most people use their company URL which is guaranteed to be unique; it will also be used for the package name.
Once you have customized it, open a DOS command prompt window, change to your Maven project directory and run the command.
Because this is your first run, it may take a while to complete as Maven must download a bunch of plugin jar files and other artifacts to your local repository. If the server times out before the downloads are complete, just run the command again.
If all has been setup correctly, the output should look something like this:
C:\data\dev\maven>mvn archetype:generate -DgroupId=net.robertovormittag.javalab -DartifactId=javalab3 -DarchetypeArtifactId=maven-archetype-quickstart -DinteractiveMode=false
[INFO] Scanning for projects...
[INFO]
[INFO] ------------------------------------------------------------------------
[INFO] Building Maven Stub Project (No POM) 1
[INFO] ------------------------------------------------------------------------
[INFO]
[INFO] >>> maven-archetype-plugin:2.4:generate (default-cli) > generate-sources
@ standalone-pom >>>
[INFO]
[INFO] <<< maven-archetype-plugin:2.4:generate (default-cli) < generate-sources
@ standalone-pom <<<
[INFO]
[INFO] --- maven-archetype-plugin:2.4:generate (default-cli) @ standalone-pom --
[INFO] Generating project in Batch mode
[INFO] -------------------------------------------------------------------------
[INFO] Using following parameters for creating project from Old (1.x) Archetype:
 maven-archetype-quickstart:1.0
[INFO] -------------------------------------------------------------------------
[INFO] Parameter: basedir, Value: C:\data\dev\maven
[INFO] Parameter: package, Value: net.robertovormittag.javalab
[INFO] Parameter: groupId, Value: net.robertovormittag.javalab
[INFO] Parameter: artifactId, Value: javalab3
[INFO] Parameter: packageName, Value: net.robertovormittag.javalab
[INFO] Parameter: version, Value: 1.0-SNAPSHOT
[INFO] project created from Old (1.x) Archetype in dir: C:\data\dev\maven\javalab1
[INFO] ------------------------------------------------------------------------
[INFO] BUILD SUCCESS
[INFO] ------------------------------------------------------------------------
[INFO] Total time: 28.158 s
[INFO] Finished at: 2015-09-25T19:13:49+01:00
[INFO] Final Memory: 10M/26M
[INFO] ------------------------------------------------------------------------
You will find that a directory with the artifactId name has been created, containing the standard project structure, as you can see below:
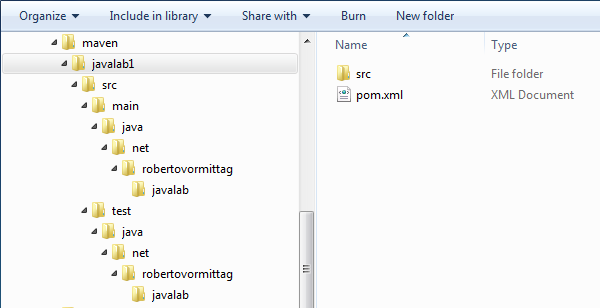
The Maven quickstart project directory structure
In the root directory you find the Project Object Model (POM) configuration file pom.xml which contains all the information required by Maven to build and run the project. If you open it in a text editor, you can see that it contains the group and artifact ids that you have specified when creating the archetype. Notice that it has a element which defines all the libraries required by the project. As this is a basic core Java project, the only dependency configured is JUnit, which is needed for automated unit testing and TDD.
The only change we need to make at this point to the POM file is to specify the JDK compiler compliance level to Java SE 1.8 by adding the following properties at the end of your POM file, just before the closing tag:
<properties>
   <maven.compiler.source>1.8</maven.compiler.source>
   <maven.compiler.target>1.8</maven.compiler.target>
</properties>
This will prevent us from getting a compiler compliance warning when we get to import the project into Eclipse in Part 2 of this tutorial.
It is a good idea to familiarize with the POM structure when you have some spare time. A good introduction can be found at:
https://maven.apache.org/guides/introduction/introduction-to-the-pom.html
Below the project root directory, is the src folder containing the source files for the main code and tests. To build the project, open a DOS window, change to the project root directory (where the POM file lives) and run the following command:
mvn clean package
If all goes well, the last lines of the output should look something like the following:
-------------------------------------------------------
 T E S T S
-------------------------------------------------------
Running net.robertovormittag.javalab.AppTest
Tests run: 1, Failures: 0, Errors: 0, Skipped: 0, Time elapsed: 0.006 sec

Results :

Tests run: 1, Failures: 0, Errors: 0, Skipped: 0

[INFO] ------------------------------------------------------------------------
[INFO] BUILD SUCCESS
[INFO] ------------------------------------------------------------------------
[INFO] Total time: 2.372 s
[INFO] Finished at: 2015-09-25T19:32:12+01:00
[INFO] Final Memory: 12M/30M
[INFO] ------------------------------------------------------------------------
This command compiles the code, run the unit tests and package it into a distributable format, i.e. a JAR file. If you look at the project directory tree now, you will find there is a new “target” directory below the project root, as illustrated below.
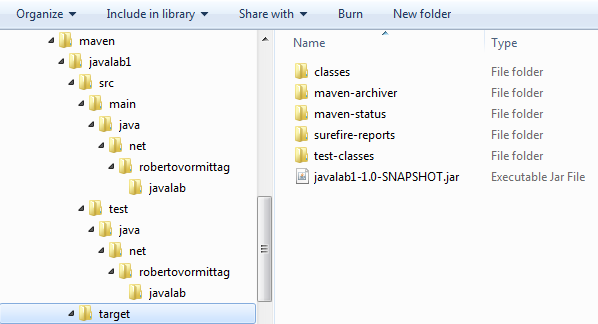
The Maven target directory
Inside the “target” directory is where Maven places the compiled class files for the code and tests, as well as the test reports and the distributable JAR file, with the version number appended to the artifact name.
You can run the packaged application with the following command, taking care of replacing the artifact and package name to match what you have set:
%JAVA_HOME%/bin/java -cp target/javalab1-1.0-SNAPSHOT.jar net.robertovormittag.javalab.App
If all goes well you should see “Hello World!” printed in the output. We are done as far as Maven installation is concerned. To familiarise with all the Maven features, a good place to start is:
https://maven.apache.org/guides/getting-started/
We are ready now to move to the second part of this tutorial, which is the installation and setup of the IDE.